Battery Charging System – Design
Charging System
12v Charging Supply
The obvious plan of attack is for a VSR (Voltage Sensing Relay). The VSR is connected across the main engine battery and if the engine battery is above a threshold voltage (pre determined and set inside the VSR unit), the relay is energised and allows a positive voltage to pass from the engine battery, through the contacts of this VSR, to the Leisure Battery and thus charge the leisure battery.
When the engine battery voltage drops below the threshold voltage, the relay drops out and cuts the supply from engine battery to Leisure battery. This prevents the engine battery from running down flat and preventing you from starting the engine.
Ok so that is the VSR. Now for the 240v charging system.
240v Charging Supply (Version 1)
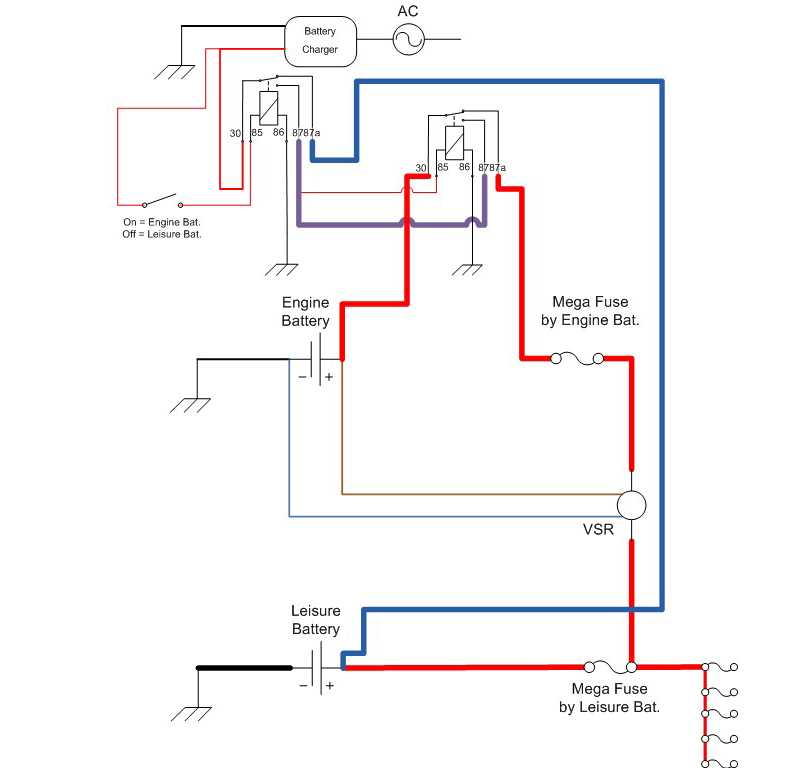
My initial thoughts were “How do I charge both batteries from the 240v charger?” I wanted to have the option of selecting which battery to charge. I came up with the following diagram:
If you leave the switch open (off) then the first relay is de-energised and the supply from the charger flows through to the Leisure battery (Blue Line).
If you flick the switch closed (on) then the relay is energised the supply passes from relay 1 (contact 87) to relay 2 (contact 87) and out to the van battery via relay 2 (contact 30).
240v Charging Supply (Version 2)
I say version 2, but actually I mean I twigged something…
If you stick the charger on the Engine battery, then when the Engine battery reaches the VSR threshold voltage (nearly instantly the charger is switched on), then the VSR will be energised and allow the voltage through from the Engine battery to the Leisure Battery.
So from the elaborate circuitry above, we move onto the circuit here:
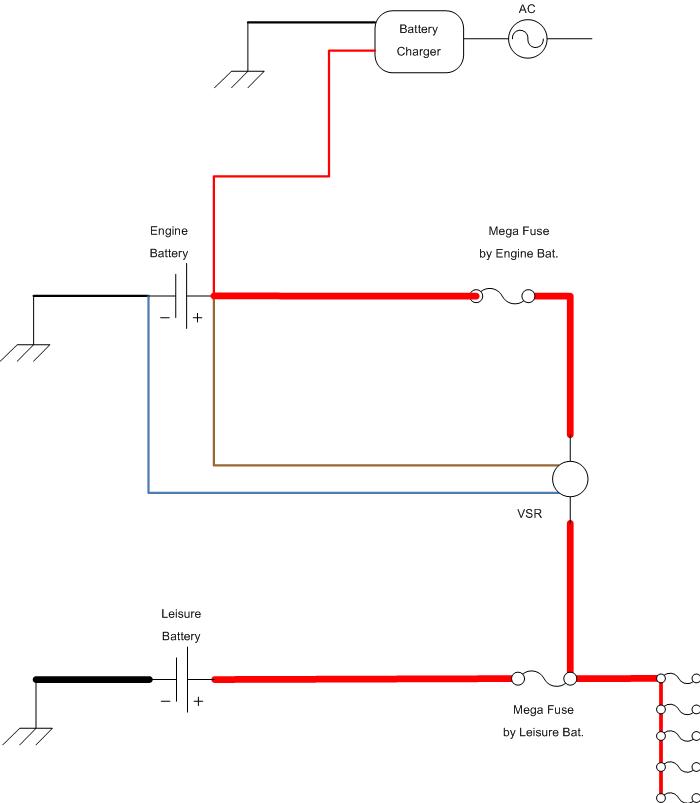
The thing to note here is that although the charger is located near the Leisure Battery, we have to connect it to the van battery. The reason being that the VSR I purchased, only monitors one battery, in my case, the van battery. There are some VSR’s that are dual sensing. These will allow the strongest battery to charge the weakest battery – if the strongest battery is above the threshold voltage.
So in our circuit, we need to run a positive through to the main van battery in the engine bay.
I purchased my 125A VSR from www.rawcomponents.com
Devon 4×4 have a BEP VSR. I think it is dual sense. http://www.devon4x4.com
Well that’s the plan for the charging circuit – version 2.