Sound Proofing / Deadening
Whilst the van is stripped, I thought I would look into sound proofing. It isn’t too complex a subject, just that most people complicate it. There is a difference between sound proofing and sound deadening, so you need to know what you want to do so to apply the correct method.
Now I’m not going to reinvent the wheel and copy the content from another website, so here is the link to the website www.sounddeadenershowdown.com I will however, give a little summary.
What I’ve Learned and What You Need to Know
Imagine you are driving on the highway and a very noisy truck is right next to you. Noise from the truck is coming at you through your vehicle’s door and it’s loud. There are three possible ways to stop the noise from reaching your ears.
The first thing you will notice is that the noise from the truck is making the door’s sheet metal vibrate – essentially turning it into an unwanted speaker that is right next to you. Apply a vibration damper like CLD Tiles to stop the vibration. CLD Tiles have been designed to work with minimal panel coverage. That means you will need to do less work and the project will cost you less.
After you have stopped the sheet metal from vibrating you have two possible strategies left to deal with the noise that is still coming through the door. One possibility is to absorb the sound. Unfortunately, absorption isn’t practical in a vehicle. The lower the frequency you need to absorb, the thicker the absorber needs to be. Road, engine and exhaust noise are deep (low frequency) sounds. To be effective, you would need an absorbent material between ten and seventy inches thick. Right, never going to happen.
Fortunately, the third option works perfectly in the space we have available. Block the noise. In exactly the same way the barrier wall along the highway is protecting the houses behind it from the truck noise that’s coming through your door and driving you crazy, you can do the same thing, on a much smaller scale, using Closed Cell Foam and Mass Loaded Vinyl.
It’s really that simple. For years, we’ve been going about this all wrong – using layer after layer of “sound deadener” and getting poor results. Use the right tool for the job.
Defining Some Terms
Before we can get anywhere, we need to make sure we are talking about the same things. “Sound Deadener” is a vague term that describes a range of materials and techniques. It has traditionally been used when referring to vibration dampers – a specific class of products designed to control resonance in panels. I’ll be referring to these products as vibration dampers.
Everything we are trying to do comes down to sound. Whether we are trying to quiet a vehicle, improve its ability to host a music system or both, it’s all about sound and controlling what reaches our ears. Sound is almost devious in its behavior so we need to understand a little bit about how it moves around before we can control it.
When it comes to noise control we are concerned with engine, exhaust, tire in contact with road surface, and wind – from our vehicle and from all of the other vehicles around us on the road. We may also be concerned with noise created by the music we play as it interacts with the vehicle around us. Some of this noise is transmitted directly through the structure of the car. Some of it travels through the air before it passes through the vehicle panels and glass on its way to our ears, often times exciting panel resonance that creates a secondary noise source.
The first step in any successful noise control or acoustic improvement project is minimizing panel resonance. It doesn’t really matter if the existing resonance is caused by vibrations directly introduced by the engine, exhaust and suspension or if it is being driven by airborne sound. Resonating panels are important routes for transmitting and reinforcing noise.
This is where vibration dampers come in. Your vehicle most likely came from the factory with at least some vibration damper applied. Unless yours is a luxury vehicle, or even if it is and you have added an aftermarket sound system that takes the vehicle beyond the original design specifications, you will want to add more vibration damper. OEM applications favor reducing weight and cutting costs beyond all else. In our zeal to quiet our vehicles, many of us took this too far in the opposite direction – applying multiple layers of vibration damper to every bit of sheet metal in the vehicle. I’ll tell you something that no one else selling vibration dampers will – this is wasteful and counter-productive. Put images of shiny silver vehicle interiors out of your mind. When it comes to vibration dampers, anything more than 25% coverage is excessive. Beyond that, you are wasting time and money, making it difficult to refit trim panels and potentially making the vehicle more difficult to service in the future – you are using the wrong tool for the job.
Ok, so I’ve copied and pasted the text above from www.sounddeadenershowdown.com I wasn’t going to but that text above explains it all so well.
So with all that in mind….. how to stop the vibrating panels…..
I was feeling flush with cash so looked into the cheapest supplier for the following and found www.caraudiosecurity.com the best. I purchased:
- 1 x Superlite Bulk Pack Sound Deadening £149.99
- 1 x Dynaliner – 1/4″ Thick sheet £79.99
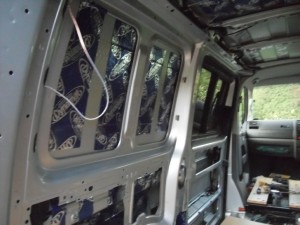
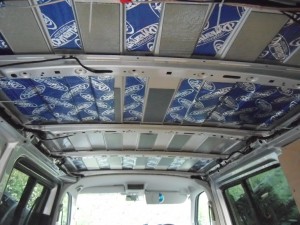
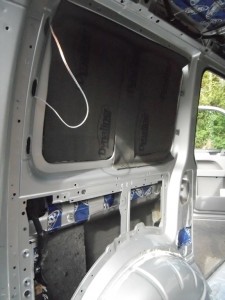
The sound deadener covers 48ft² – ample for the van. Very easy to apply, cut to size using a sharp knife and shape, peel backing off, stick on. Next!
First piece I put on the roof was a big piece. Then realised I didn’t need to cover the entire roof as that isn’t what is required of the deadener, so later cut into strips as per pic 2 below.
That’s the deadening, now for the sound absorption – Dynaliner:For what it’s worth, I think this stuff if flippin’ expensive for the amount you get. Ok it may be good due its density, but £80 for effectively this back panel and bits of the twin back doors is a bit much in my opinion. I opted to buy 3 x Karrimoor camp mats from www.Sportsdirect.com and stick them over the top of the dynamat and bare metal with the spray adhesive. |
Comments
Comment from Pete
Time 6th September 2010 at 22:29
I used the Dynamat on the metal to stop the vibration of the metal.
I then chose the Dynaliner to absorbe the sound.
Due to the price of the Dynaliner, and the fact I had now seen the Dynaliner stuff. I just thought – this looks just the same as camping mat. So purchased camping mat for £5.00 a roll (Sportsdirect.com) then cut it ous and spray adhesive the back of it and stuck over the top of dynamat.
Then applied the recycled plastic bottle insulation.
It was all the most logical order to do it in – well logical to me at least. The insulation will absorbe what the camping mat misses. It is all much better than nothing.
I really must get on and put a few more articles on the site. Had a mad rush to get some stuff done before I went on hols with the van and the new khyam driveaway tent that was absolutely massive and brilliant!
Comment from SEOPressor V5
Time 27th July 2013 at 02:06
Fantastic site. Lots of helpful info here. I am sending it to a few pals ans also sharing in
delicious. And of course, thank you for your effort!
Comment from http://osiakowegotowanie.blogspot.nl
Time 10th July 2014 at 20:30
I like the helpful information you provide in your articles.
I’ll bookmark your blog and check again here regularly. I’m quite
sure I’ll learn plenty of new stuff right here! Best of luck for
the next!
Comment from Steve the Soundman
Time 1st August 2014 at 09:13
Surely Dynamat is not the correct product for roofs
The roof is where the airborne sounds hit and Dynamat will just reflect the sound back and cause oscillation
The roof should be covered with an absorbing acoustic foam. This will also reduce condensation and is better for heat insulation
Also you do not show one of the main areas of rear noises – the rear wheel arch.
Have a look at http://www.nkgroup.co.uk we use 6 different materials so that all individual sounds are specifically covered with the best for each different noises
Comment from Pete
Time 1st August 2014 at 19:41
Thanks for the feedback Steve. I am only an amateur at this sort of thing. Expert advice is always welcome.
On my next T5 I will ensure something along the lines of your T5 kit, will be on the shopping list. Looks great!
http://www.nkgroup.co.uk/product/motorhome-and-van-vw-t5-rear-kit/
Pete


Comment from Pete Warwick
Time 6th September 2010 at 19:27
Hey Pete, thanks for writing the blog, i’m finding it really useful to follow. I have recently bought a T5 panel van and about to begin sound proofing and insulating the walls and tailgate. Just wanted to clarify – did you find that camping mats would be sufficient to sound-deaden and sound-proof before applying the insulation material? Or would you recommend applying a deadening tape as well?
Cheers, Pete